Categories
Brands
Features
Top Rated
Our Showroom
Categories
Brands
Features
Top Rated


Our Showroom


Installing a bidet attachment is one of the simplest ways to upgrade your daily routine, and the GoBidet is among the best! This great bidet attachment allows you to adjust the nozzle position and water pressure, and unlike many non-electric options, it even offers a warm water add-on! The GoBidet works with almost any toilet, and installation is a breeze! Keep reading or check out the video below to learn how to install this bidet attachment in your own bathroom.
Video Chapters:
00:00 – Introduction
00:29 – Step 1: Remove Toilet Seat
01:02 – Step 2: Place Bidet Attachment
03:55 – Step 3: Connect Water to Bidet
07:26 – Step 4: Check for Leaks
09:40 – Step 5: Test the Bidet
11:15 – Closing Statement
Video Note: The GoBidet now comes with a one-year warranty.
The GoBidet is our favorite bidet attachment, and getting it up and running couldn’t be easier! Installing this handy add-on will have you on your way to a complete water cleanse in just minutes.
The GoBidet sits between the toilet seat and the rim of the toilet, so you’ll need to remove your toilet seat to put it in place. Simply unscrew the nuts from the mounting bolts on the underside of the toilet and lift the seat off. Be sure not to lose the bolts or nuts – you’ll use the same hardware to reattach the seat when you’re done!
With its single-bolt connection, the GoBidet attaches quickly and easily to just about any toilet. The rubber washer that sits under the arm does double duty, keeping the attachment from wobbling and protecting your toilet from scratches.
Pro Tip: If you have the hot water kit for the GoBidet, get that ready to go before you install the attachment. Use a flat-head screwdriver to remove the cap on the hot water inlet (marked with an “H”) and install the nub that came with your kit.
To install the GoBidet, simply unscrew the nut and remove the plastic washer, leaving the black rubber washer at the top in place. Then, insert the bolt into your toilet’s bolt hole (you want the attachment to be on your right when you sit down on the toilet). Slide the plastic washer over the bolt from underneath and securely tighten the nut. You can either hand-tighten the nut or gently snug it up using a wrench. Set the spacer (it’ll be in the smaller box with the T-valve) into the other bolt hole.
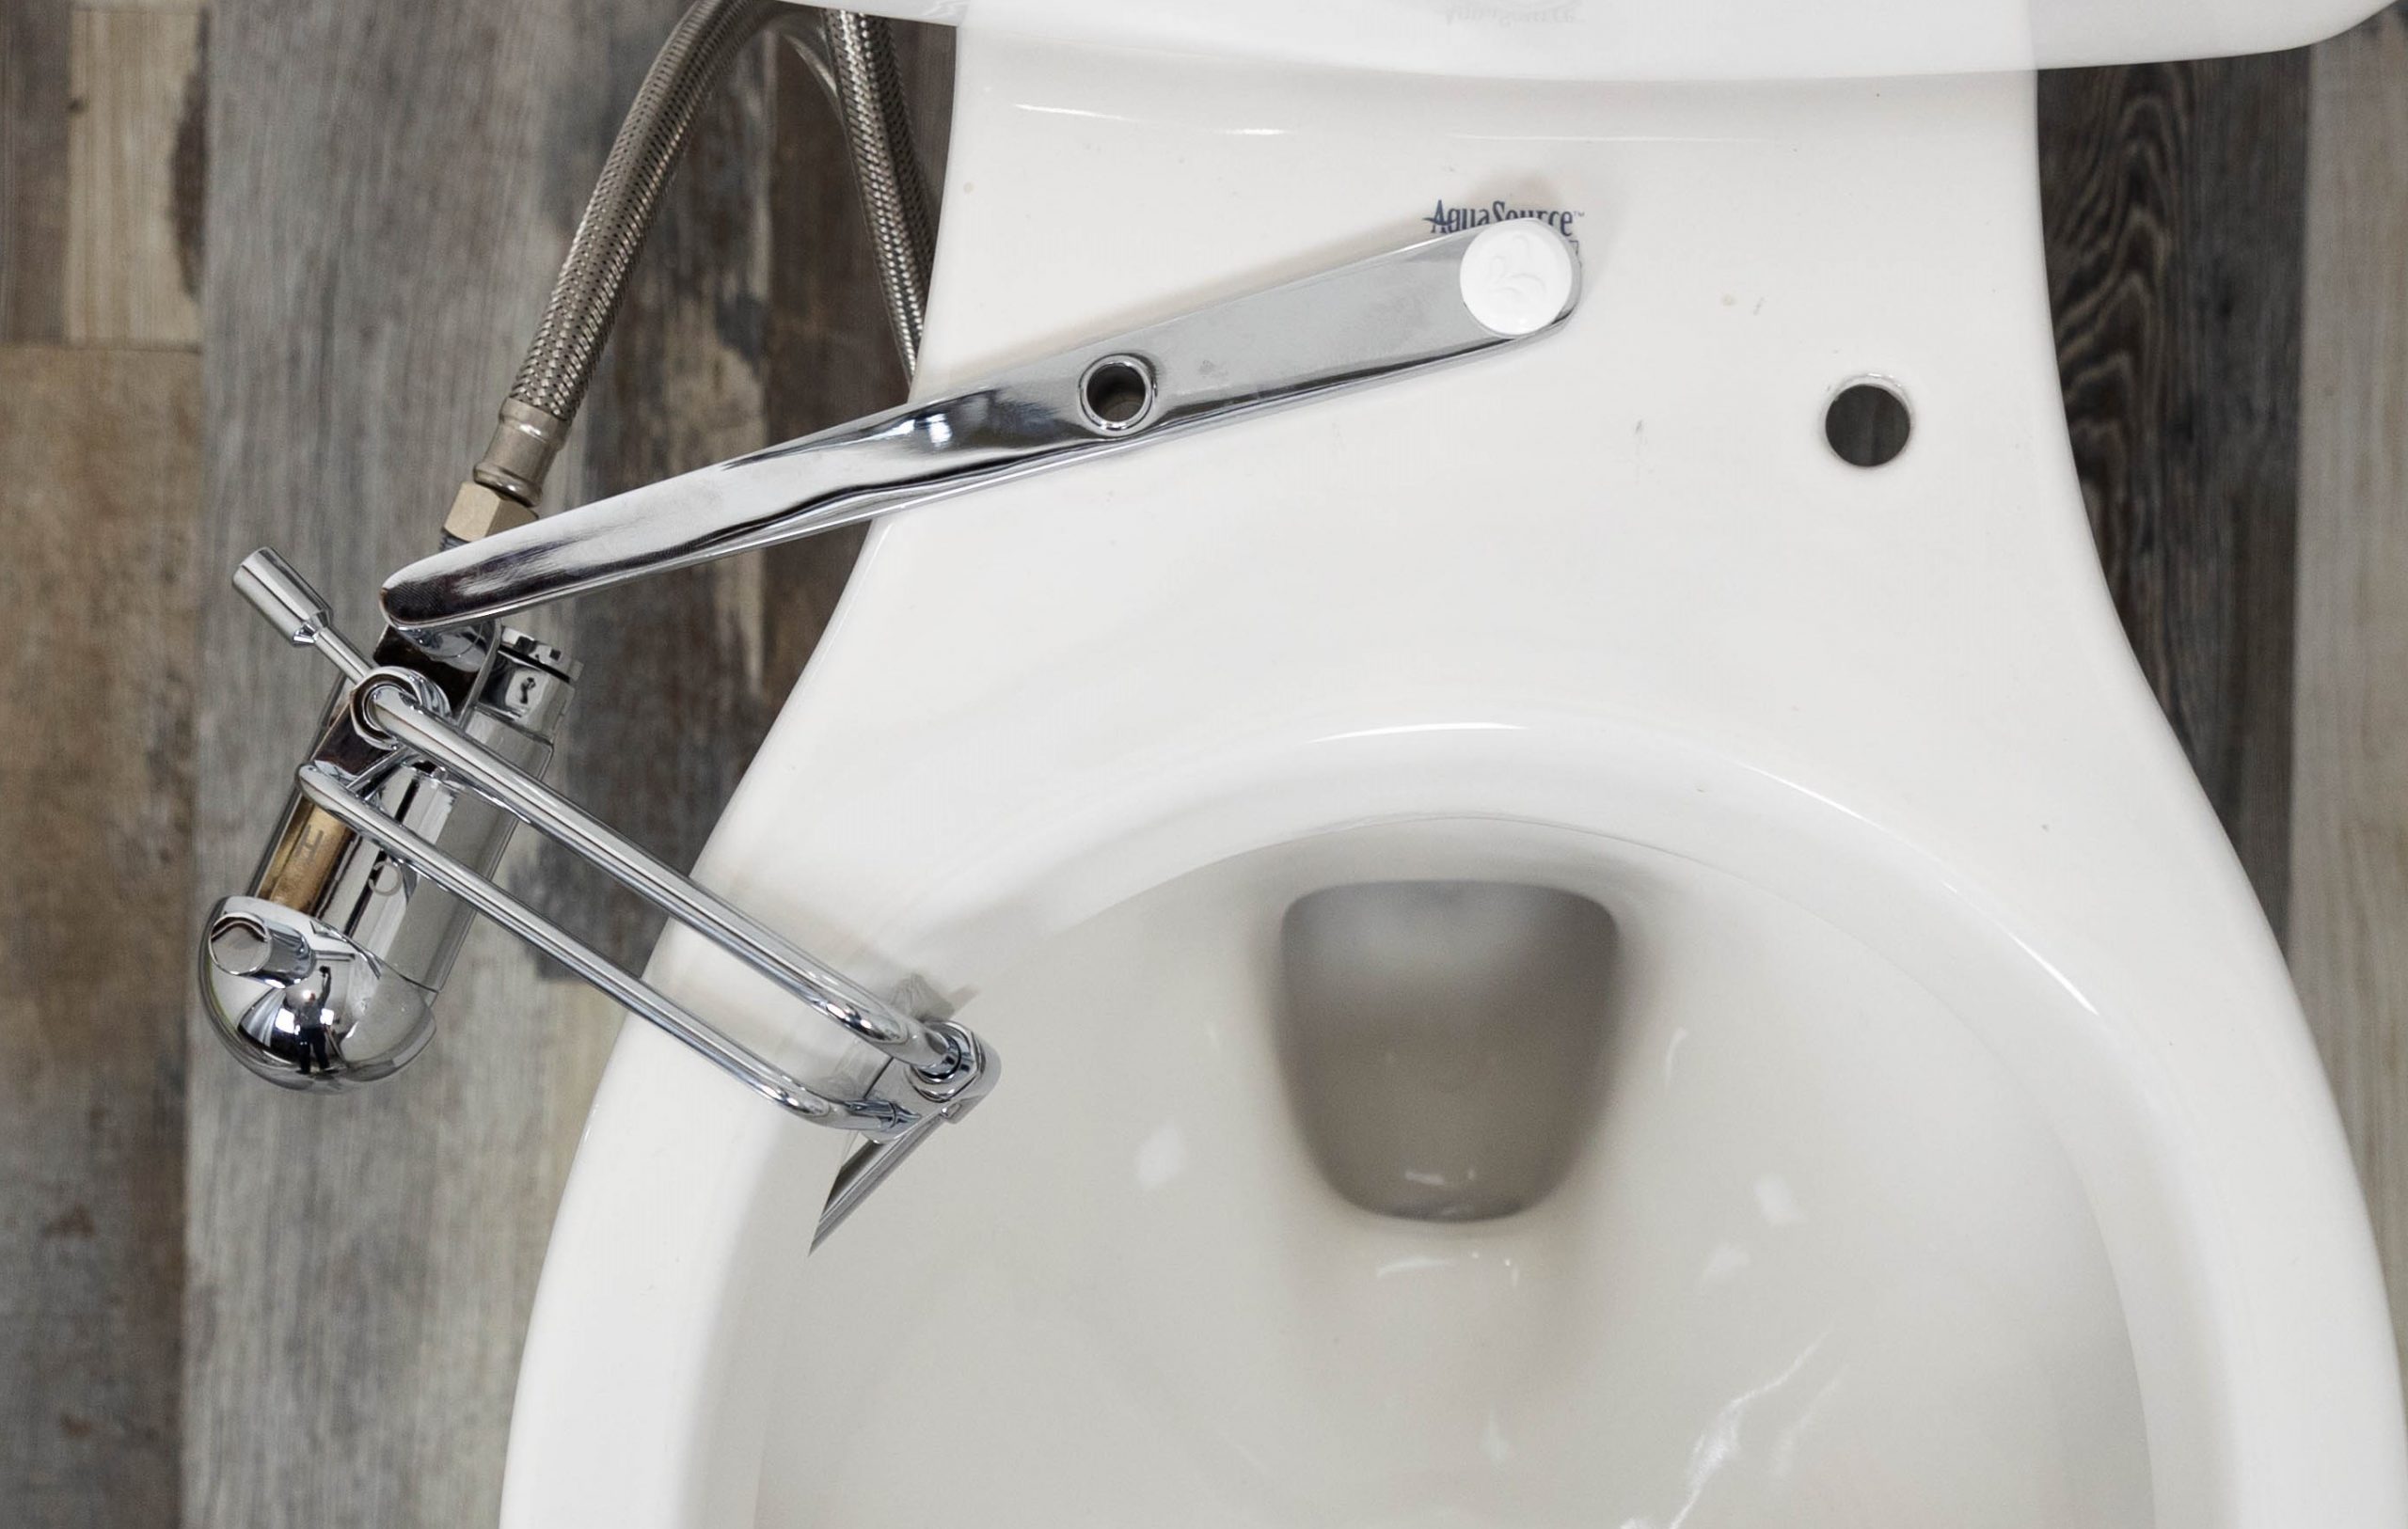

You’ll notice that the GoBidet’s arms go over the rim of the toilet bowl, which allows the nozzle to hide inside the toilet bowl. It also gives you the flexibility to adjust the nozzle for perfect positioning in a front or rear wash. But if the overall placement just isn’t quite right with your toilet, you have the option to change the mounting position. To do this, unscrew the GoBidet’s bolt completely and thread it into the second hole on the arm.
Now it’s time to get water flowing to your GoBidet! First, turn off the water supply to the toilet and hold down the flush mechanism to drain the tank. (You’ll want to have a rag on hand to soak up any drips.) Disconnect the water supply hose from the bottom of the toilet tank and screw on the T-valve that came with your GoBidet. You may choose to use a little plumber’s tape (also included with your GoBidet) on the threads for a better seal. Then, make sure the rubber gasket is seated in the water supply hose and screw it onto the bottom of the T-valve. Finally, attach one end of the bidet’s water hose to the offshoot on the T-valve and the other to the cold water inlet (marked with a “C”) on the GoBidet. Gently tighten the connections with a wrench.
If you have the standard cold water GoBidet, you’re done with plumbing! If you’re using the hot water kit, you’ll have an additional hose to connect to the hot water inlet (marked with an “H”) and your sink’s water line.

With all the hoses securely fastened, you can finalize the placement of your GoBidet. Move the arm and nozzle to the right spot and tighten the nut on the bottom side of the arm (above the water inlet) to keep it firmly in position.
When everything is where it belongs, reattach your toilet seat by inserting the bolts through the GoBidet arm on one side and the plastic spacer on the other. Tighten the nuts onto the bolts from underneath to secure the seat in place.
With your new bidet attachment installed and your toilet put back together, it’s time to get the water flowing! Slowly turn on the water supply and check for leaks. There are a few specific spots to inspect:
If you notice any rogue water, turn the water supply off immediately and flush the toilet to drain the tank. Then, undo the leaky connection and make sure any rubber washers are still in place. If you’re having trouble getting a good seal, you can use a little bit of plumber’s tape on the threads. Reconnect the valve or hose, turn on the water and do another leak check. If you continue to run into issues, let us know and we’ll do our best to help you troubleshoot!
Once you’ve achieved a leak-free install, it’s time for the fun part: testing your new GoBidet! The front lever controls the wash (forward is off and backward is on) and the rear lever adjusts the nozzle position.
Pro Tip: Moving the rear lever all the way toward the back of the toilet will neatly stow the GoBidet’s nozzle under the toilet rim when you’re not using it.
With the wash on, turn the lever toward the toilet to increase the water pressure and away to lower the pressure. (If the water doesn’t start flowing and you’re using the cold water version, make sure the front level isn’t turned toward the hot water inlet.) The GoBidet delivers great pressure using only your home’s water pressure, so we recommend going slow until you get the hang of it!
That’s all, folks! The GoBidet’s simple setup means you’re ready to go without any additional fuss. We know the GoBidet inside and out, so if you have any questions or run into issues with the install, a bidet expert is just a click or call away.
Enjoying the superior water cleanse but dreaming of premium perks like unlimited warm water, a comfy heated seat and a warm air dryer? We can also help you upgrade to your perfect electric bidet seat.
Meghan Oliver is a writer and content manager with Many Bidets. Her work has appeared in Nonprofit World magazine and on Psych Central, but she specializes in behind-the-scenes content for small businesses and nonprofit organizations. Meghan is passionate about conservation, creatures of all kinds and the Oxford comma. When she's not writing, she's probably at the barn, on a hiking trail, in her native garden bothering the pollinators(,) or curled up with a book and a cat.
Not sure where to start? Our quiz makes it easy to find the bidet of your dreams.
Get your recommendation now!
Many Bidets’ Privacy Notice
This privacy notice discloses the privacy practices for ManyBidets.com. This privacy notice applies solely to information collected by this website.
We will use your information to respond to you, regarding the reason you contacted us. We will not share your information with any third party outside of our organization, other than as necessary to fulfill your request, e.g. to ship an order.
Unless you ask us not to, we may contact you via email in the future to tell you about specials, new products or services, or changes to this privacy policy.
Your Access to and Control Over Information
You may opt out of any future contacts from us at any time. You can do the following at any time by contacting us via the email address or phone number given on our website.
Security
We take precautions to protect your information. When you submit sensitive information via the website, your information is protected both online and offline.
Wherever we collect sensitive information (such as credit card data), that information is encrypted and transmitted to us in a secure way. You can verify this by looking for a lock icon in the address bar and looking for “https” at the beginning of the address of the Web page.