How to Install a TOTO WASHLET+ Skirted Toilet and Bidet Seat

 | Created August 18, 2025 | Updated August 21, 2025

We love TOTO’s WASHLET+ bidet and toilet combinations because they give you plenty of customization options and the sleek look of an integrated bidet toilet at a lower price point. But since you have to replace your toilet, the installation process has a few more steps than installing a bidet seat on your current toilet. Want to see if it’s a job for a plumber or if you can tackle the installation yourself? Follow along with Sam Johnson as he installs one of our favorite WASHLET+ combinations: the TOTO Nexus toilet and S7 WASHLET bidet seat.

Video Chapters:

00:00 – Introduction
00:21 – Tools
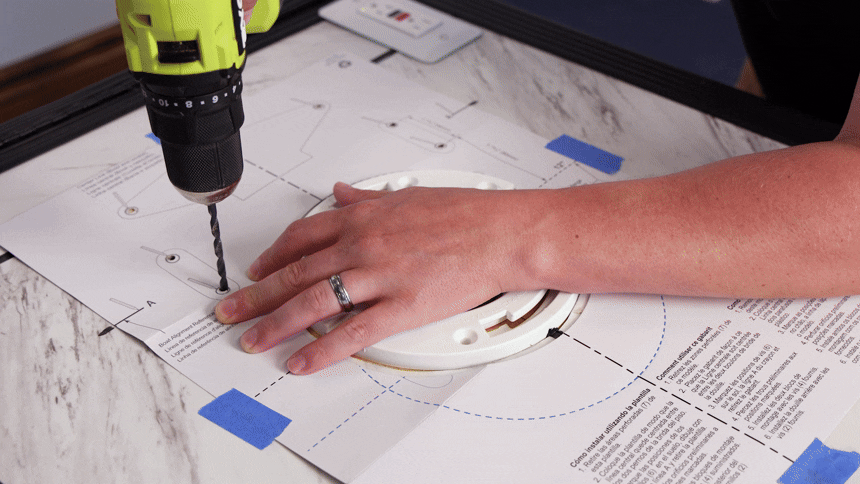
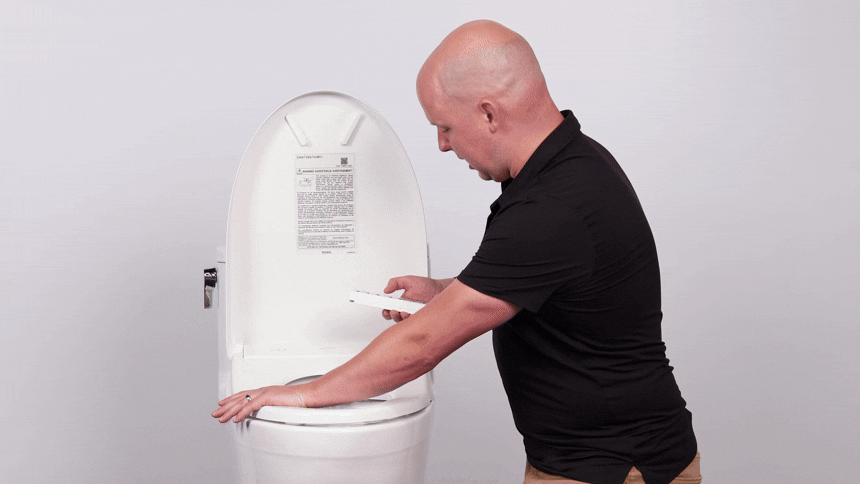
01:12 – Step 1: Mark and Drill Holes
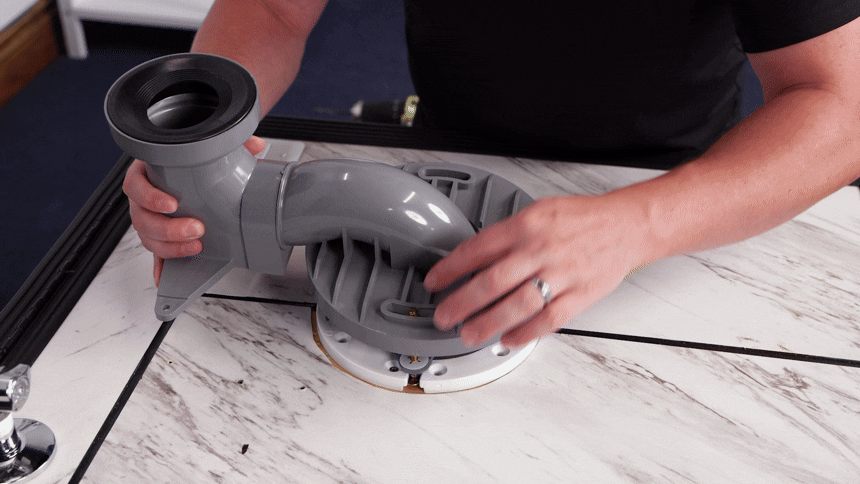
02:43 – Step 2: Install Flange Adapter
06:39 – Step 3: Place and Secure Toilet
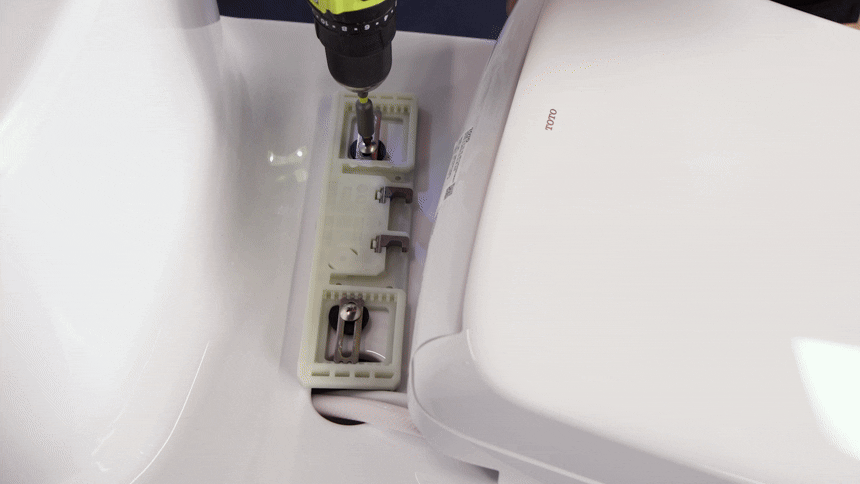
10:12 – Step 4: Install Bidet Mounting Plate
12:44 – Step 5: Connect Water and Power
14:33 – Step 6: Set Up Remote and Test

Have a different WASHLET+ toilet? This walkthrough will help you install any of TOTO’s WASHLET+ floor-mounted skirted toilets, including the customer-favorite Aquia IV. And if you need to know how to install an auto flush kit on a TOTO WASHLET+ side flush toilet, we’ve got all the steps for that, too.

What tools do I need to install a TOTO WASHLET+ system?

TOTO WASHLET+ systems come with all the parts you need to get your toilet and bidet seat up and running, but you’ll need some basic tools to complete the job:

  • A drill with an adjustable clutch and a 3/16” drill bit
  • Phillips #2 and #3 drill bits or handheld Phillips-head screwdrivers
  • An adjustable, open-ended wrench
  • A pencil or dry erase marker to mark the hole locations on the floor
  • Tape to hold the template in place (we like to use painter’s tape)

A standard wax ring is included if you purchase your WASHLET+ system from us, but if you’d prefer a Better Than Wax toilet seal like the one we use in the video, you’ll need to purchase it separately. The Better Than Wax toilet seals come with toilet bolts, so if you’re not using one, make sure your existing bolts are in good condition or pick up some new ones.

Pro Tip: A standard 3/16” drill bit will work if you’re drilling into wood. If you’re drilling into ceramic tile or concrete, you’ll need a larger drill bit to accommodate the anchors. Make sure your bit is designed to work with the material you’re drilling into.

Step 1: Mark the floor and drill the holes

An animated GIF showing where to drill and mark holes when installing skirted TOTO WASHLET+ toilets
  1. Determine if you have a 12” or 14” rough-in (the distance from the flange to the wall).
  2. Cut out the appropriate circle from the template, line up the hole over the flange and tape it in place.
  3. Prepare the drill with the 3/16” drill bit (or a larger bit if you’re drilling into ceramic tile or concrete) and drill holes in the four spots next to the Bowl Alignment Reference Lines.
  4. Mark the other two spots (to either side of the Center Line on the template) with a pencil or marker.
  5. Mark the floor on both sides of the template next to the Bowl Alignment Reference Lines (marked A on the template). These marks will line up with the holes in the sides of the toilet and help you line the toilet up with the right spot on the flange adapter.
  6. Remove the template when you’re done drilling and marking.

Step 2: Install the flange adapter

An animated GIF showing how to install the flange adapter for a TOTO WASHLET+ skirted toilet
  1. If you’re replacing an existing toilet, make sure your toilet flange is free of any residue from an old wax ring.
  2. If you’re using a Better Than Wax seal, place the included bolts into the slots or holes on the toilet flange. Slide the holes over the bolts, then install the plastic washers onto the bolts. If you’re using a standard wax ring, clean or replace the bolts and center the wax ring over the toilet flange.
  3. Place the flange adapter onto the bolts using the holes on either side, making sure it’s centered over the toilet flange. Gently push the flange adapter down, then slide the washers over the bolts and screw on the nuts without tightening them fully.
  4. Insert the #2 Phillips-head driver bit into your drill (with the clutch set very low) or grab your handheld screwdriver. Put the small screws (these may be taped to the back of the flange adapter) through the holes at the back of the adapter, aligning them with the marks you made in Step 1.
  5. Tighten the screws down and then use your wrench to finish tightening the nuts onto the bolts, taking care not to overtighten them.
  6. Place the white blocks over the mounting holes you drilled in Step 1. Thread the longer screws through the washers and screw them into the blocks using the #3 Phillips-head driver bit or a larger screwdriver, again making sure you don’t overtighten them and crack the plastic.

Step 3: Place and secure the toilet

An animated GIF demonstrating how to install a TOTO WASHLET+ skirted toilet on the flange adapter

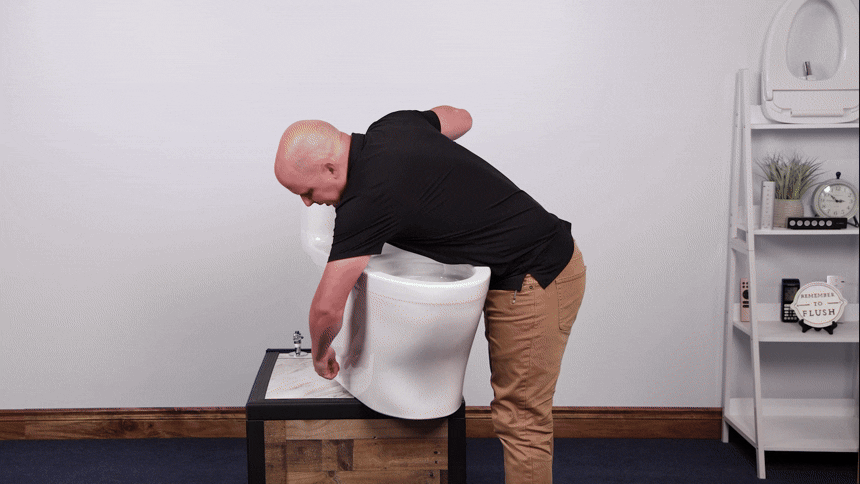
Pro Tip: Our setup for the video gives us full 360-degree access to the area around the toilet, which you probably won’t have. If you’re DIYing the install, this is a great time to tag in a friend to help you lift the toilet and set it into place!

  1. Lift the toilet over the flange adapter, being sure to line up the holes on the sides with the marks on the floor you made in Step 1. When it’s lined up properly, the toilet will drop right onto the flange adapter.
  2. Adjust the front of the toilet to make sure it’s square to the room and the wall. You can check by measuring the distance from the back of the tank to the wall on both sides.
  3. Put the large screws with the cutout in the head through the holes in the sides of the toilet and slowly tighten them using the #3 Phillips-head driver bit (with the clutch on the drill set very low) or a larger screwdriver.
  4. Turn the clutch up as needed once the screws are almost fully installed, stopping as soon as they’re tight so you don’t damage the porcelain.
  5. Once the screws are seated, pop the round plastic cover onto the head of the screw.
  6. Put the lid onto the toilet tank. If you can’t find the lid, check the piece of cardboard in the main box – there’s a bumpout area at the bottom where the lid is stored.

Step 4: Install the bidet mounting plate

An animated GIF showing how to install the bidet mounting plate on a TOTO WASHLET+ toilet
  1. Insert the black rubber sleeves into the bolt holes between the toilet bowl and tank. You can either wiggle them back and forth while pushing down or slightly screw one of the bolts into the sleeve and use your drill or screwdriver to press the sleeve down and through the hole (removing the bolt when you’re done).
  2. Grab your WASHLET+ bidet seat and thread the hose and power cord through the larger hole in the toilet and toward the wall.
  3. Place the mounting plate over the bolt holes with the hooks facing forward, then set the metal brackets into the mounting plate and put the bolts through the brackets and into the sleeves.
  4. Using the #2 Phillips-head driver bit or smaller screwdriver, screw the bolts into the sleeves with light pressure – pushing too hard risks popping the sleeve into the back of the toilet. When you see the sleeve start to lift as you tighten, you can add more pressure.
  5. Check to see if you can move the mounting plate with your hand. If you can, tighten the bolts until the mounting plate stays in place.
  6. When the mounting plate is securely attached, line up the back of the bidet seat with the mounting plate and slide it backwards onto the bracket, making sure the hose and power cord are sliding through the hole and not getting pinched or kinked. You’ll hear a click when the bidet seat is in place.

Pro Tip: If it’s difficult to get the rubber sleeves into the bolt holes, use a drop of dish soap on the sleeves to help them slide into place.

Step 5: Connect water and power

If you don’t already have a water supply hose, your first step will be to attach one to your toilet’s water supply. We use a 9” supply hose in the video, but you may need a different length depending on your bathroom’s layout.

An animated GIF showing how to install the T-valve on a TOTO WASHLET+ system

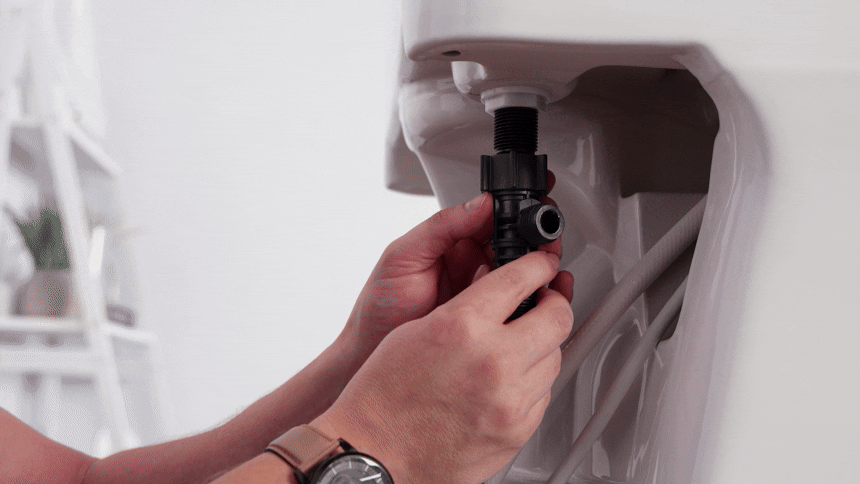
Pro Tip: Thanks to the rubber seals on the connections, there’s no need to use plumber’s tape!

  1. Attach the T connector to the fill valve on the bottom of the toilet tank and screw the supply hose to the bottom of the T connector, making sure you’re not cross-threading.
  2. Slide the bidet hose into the horizontal side of the T connector and screw it into place. Hand-tightening is all you need here – the threads are plastic, so you don’t want to overtighten.
  3. Turn on the water supply and check all three connection points on the T connector for leaks. If there are any leaks, turn the water off and check the hoses to make sure the rubber O-rings and washers are in place and the connections are threaded properly, then turn the water on and re-check for leaks.
  4. Plug the power cord into a GFCI outlet and watch your bidet seat boot up.

Step 6: Set up the remote control and test the bidet functions

An animated GIF showing how to test an installed TOTO WASHLET+ bidet seat

Pro Tip: The wireless remote control comes with two separate mounting plates – one that locks it into place and one that holds it with magnets. We recommend the magnet option since it’s easier to take the remote off the wall and access the buttons on the back.

  1. Use the included screws (with anchors, if needed) to attach the remote control mounting plate to a wall or vanity near the toilet at your desired height.
  2. Insert the included AAA batteries into the remote by pushing in the indent on the bottom of the remote and pulling the battery compartment door away from the remote, then reinstall the battery compartment door and click it into place.
  3. Test your bidet by covering the skin sensor on the front left part of the seat (when facing the toilet) with your hand. When the skin sensor is activated, you’ll hear the seat pre-rinse its nozzles in preparation for a wash.
  4. Hold your other hand or a container above the nozzles to contain the spray and press the rear wash button on the remote to start a wash.
  5. To stop the wash, press the Stop button on the remote or simply remove your hand from the skin sensor.

If the wash runs properly, your WASHLET+ system is fully installed and ready to use!

Pro Tip: The S2 and S5 bidet seats use a pressure sensor located in the seat hinge rather than a skin sensor, so you’ll need to put pressure on the seat to use the bidet functions.

We’re Here to Help!

If you’re installing your WASHLET+ and feel a little stuck, get in touch for an assist! Or if you don’t have your own WASHLET+ yet and want to find the perfect combination for your bathroom, we’ll walk you through all the options.

Meghan Oliver

Meghan Oliver is a writer and content manager with Many Bidets. Her work has appeared in Nonprofit World magazine and on Psych Central, but she specializes in behind-the-scenes content for small businesses and nonprofit organizations. Meghan is passionate about conservation, creatures of all kinds and the Oxford comma. When she's not writing, she's probably at the barn, on a hiking trail, in her native garden bothering the pollinators(,) or curled up with a book and a cat.